Showing posts with label kids. Show all posts

Saturday, April 20, 2013

Radiant Rapunzel

 Last A to Z Challenge post of the week! Today's letter is R, for Radiant Rapunzel, the first character costume I made for my daughter.
 We're big fans of Tangled in my house, so when I asked my daughter what she wanted to be for Halloween, she picked Rapunzel. I might have encouraged the choice a little bit... and then she tried to change her mind after I bought the fabric and started planning the costume - no turning back then! (If you look above, this dress is one of the items in my logo banner!)

I stubbornly refused to buy the Disney brand Simplicity pattern for this costume, partly because I thought I could do better without it, and partly because I do not like single-style patterns, and there were no other dresses it showed as options. The Cinderella costume pattern from last year was different - it can be Snow White also. Instead, I used a formal girls dress pattern my mom had handed down to me. I think she got two copies of it by mistake one time. Free patterns can sometimes be best patterns, and Simplicity 4764 was a good fit!
Pretty flower girls, aren't they? I liked the skirt and sleeves, but the bodice needed work to be Rapunzel's.
This was my sketch, to get an idea I could draw and scribble on, not one of my daughter's books or her play table with Rapunzel on it! I decided to just make the bodice wider, and fold over and sew for the corset parts - it didn't need to be supportive or shaped around breasts, not for a two and a half year old!
 I did a lot of this work in a marathon sewing session, staying up all night watching The Lord of the Rings Extended Edition, finally - after probably five or more years of having those dvds and never watching them. (I watched all of our Star Wars dvds while sewing the Cinderella costume [original trilogy]) Remotes can make handy pattern weights!
My first attempt at widening the bodice for the corset inlay wasn't quite wide enough... the wider one was actually my third attempt! Good thing I got extra fabric, and this didn't take much yardage.
This is a little bit of the steps I took - figuring out how far apart, fold, pin, sew, iron, sew more!
The sleeves weren't too complicated, once I discovered the ribbon I thought would work for stripes was too sheer and wouldn't show up. Extra bit of pink satin to the rescue! I cut the pink satin close to the shape of the sleeve - narrower because there wouldn't be stripes in the underarm area, taller because I wanted them caught fully in the seams. Then I cut strips, ironed down both sides, pinned to the purple sleeves in rows, and stitched them on. Adding the lace at the bottom is just the perfect little touch!

For the skirt, I made the main front panel a lighter purple, with two overhangs of darker purple coming over that on both sides. Gathering the skirt together to attach to the bodice can be a pain when it's a full skirt, but that rectangle sure does look pretty when it's all together, doesn't it?

Here you can see the dress almost finished... with sleeves, then the grommets! I love my grommet presser, it's so nice to come up with a project like this, and know I can add in grommets with ease. This dress also has the MOST trim I've ever put on a single dress - but it's all costume-appropriate. Since in the movie, Rapunzel makes her own dresses, I think she just has a thing for lace.

I may be a snob when it comes to store bought costumes, but I can be a sucker for licensed accessories... This year, she didn't get the princess shoes (they were sold out anyhow), but she got a light up crown that came with a musical necklace and a purse - mainly I wanted the iconic crown! And she already had the doll, I can't resist taking a photo of doll and costume!

 And here, the princess herself in her dress! She still loves it, even though the satin snagged early on. Maybe it's because I let her sit on that bridge? There is a lot of length hemmed up in the skirt with the idea of letting it out as she grows taller, but with the snags I'm thinking that's a no-go. Oh well, she can have fun with it now!
Thanks for joining me again on the A to Z blogging journey! Check out the other bloggers in the challenge and come back next week for more!

Tuesday, April 16, 2013

Neat Nails

 Thank you for joining me yet again for the A to Z Blogging Challenge! Today's post is for the letter N, for Neat Nails!
 There is a lot of paint in my home. A LOT. Acrylic paint, glitter paint, miniature paint, oh and paint for nails - nail polish! You might say I collect it. Some of these paints I've had longer than I've known my husband, and most of them still work well.
 I love painting my nails, it's a special bit of me time that I can then show off for a few days (no matter what I try, nail polish usually chips in 2-3 days!) Glitter is a lot of fun, above are some of my newer glitters - purple and green!
 Nail art is a lot of fun! These were both summer nail designs. The yellow suns I made with a small paint brush in yellow nail polish, the black happy faces I used a nail art pen for.
 These flowers were inspired by A Mom In Red High Heels' nail art post, I couldn't help myself!

 I wasn't super happy with my first flowers, so I decided to try it again, to match one of my favorite shirts.
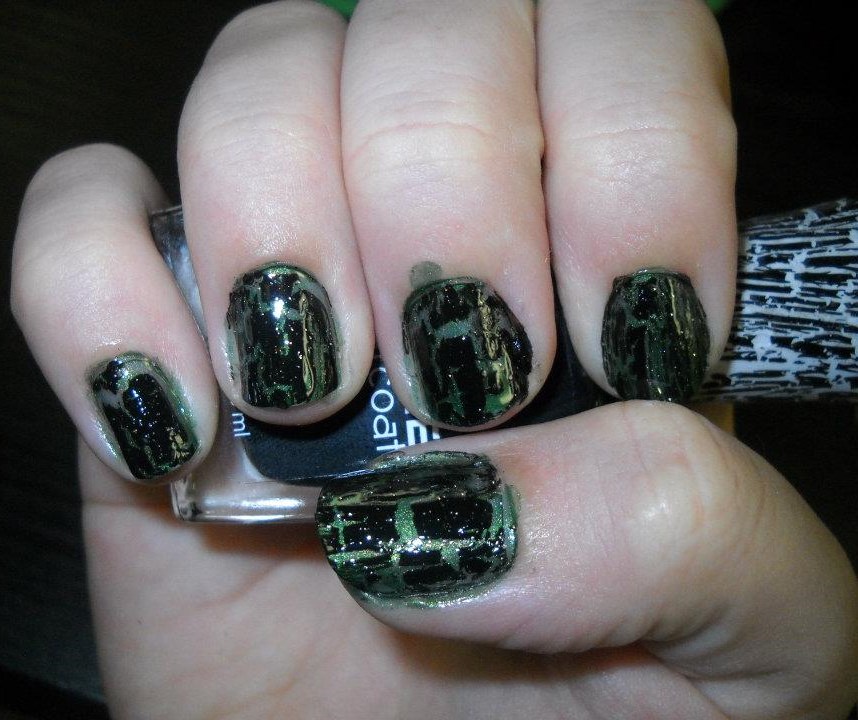
  Can you tell I like green? This was a work of many layers - green, glow in the dark green, black crackle, then silver glitter on top. They glowed between the cracks, it was pretty neat! An idea for Halloween. But I couldn't get a good photo of them glowing.
  Something new came out in the last two years - magnetic nail polish! It's very time consuming, because you can only paint one nail at a time. Paint, place magnet over, wait for design to appear, check, repeat 9 times! But it looks really neat, and is fun to mix colors side by side in.

You can get different magnets too, currently I think I have seven or more colors, and five different magnet designs.

 The idea below I got from an exclusively nail art blog, the idea is Lisa Frank, with a rainbow of colors under black crackle. I wasn't very happy with how mine looked, it was more 80s fashion than I'm a fan of. Lighter colors might have worked better, or different color combinations (most of the nails had three colors)
 I had more fun with glitter above, for the Fourth of July week.

You might notice some of these pictures are better than others - I used to photograph a nail design right away, now I wait till the next day after I've cleaned off the smudges around my fingers. But I can't go back and fix the old photos without re-creating those designs, and there's always something new to try! =)

Below is some more fun nail art! I have a black, a white, and a pink nail art pen, but the black is bleeding a lot and the white is almost dry... I wonder why!
Stars and stripes - always a classic!
 I'd like to try stenciling or stamping, but haven't gotten into it yet. I did try some uv-free gel nail polish and that did NOT end well. So back to traditional polish for now - not like I have a lack of options! I wonder how I'll paint my nails next? Maybe with letters for the A to Z Challenge!

My daughter already loves nail polish too - and she wants the same flowers I put on mine, and always glitter on top!
 Do you have a favorite nail polish or design, or technique? Share in the comments!
I hope you enjoyed another insight into my fun creations and collections! Join me again tomorrow for something that starts with O!

Friday, April 12, 2013

Kids' Crafts

 Welcome again to the A to Z Blogging Challenge! Today's letter is K and I'm focusing on Kids' Crafts for the day.
 

 Doing crafts with kids can be fun! But you don't always have the best outcome...
The point is, though, that they had fun!

We used to go to a story time weekly in Michigan that did a craft after the story, and ended up with a fridge full of kid crafts!
Here's the pink pumpkin in detail, I came up with that for her after we read Pinkalicious' pink pumpkin book.

One of my favorite crafts that we made recently was a little pennant flag.
 It's really simple! Just fold a piece of construction paper in half and cut a triangle out.
Take a stick and stick that in the fold, slather glue on one side to glue the sides together, then decorate with crayon, markers, or even better, sticky back fun foam! I have some left over from other crafts, so I've been having some fun with it. 


Can you tell? (I had to keep looking at reference pictures for the mice)

One more fun craft is this pot o' gold, that we made for St. Patrick's Day
I feel bad, my daughter didn't get to make any Easter crafts, have to make that up to her with some fun spring and summer crafts! Her birthday is coming up, I'm pinning some fun ideas on Pinterest for her party! Follow me on Pinterest for more fun ideas!

Thanks for joining me again for the A to Z Blogging Challenge! Join me again tomorrow for something that starts with L!